Configuration
When you have appdaemon installed by either method you are ready to
start working on the appdaemon.yaml file. For docker users, you will
already have a skeleton to work with. For pip users, you need to create
a configuration directory somewhere (e.g. /home/homeassistant/conf)
and create a file in there called appdaemon.yaml.
Initial Setup
Your initial appdaemon.yaml file should look something like this if you are using the HASS plugin:
appdaemon:
  threads: 10
  plugins:
    HASS:
      type: hass
      ha_url: <some_url>
      token: <some_long_lived_access_token>
The top level consists of a number of sections:
log
The log: section is optional but if included, must have at least one directive in it. The directives are as follows:
logfile(optional) is the path to where you wantAppDaemonto keep its main log. When run from the command line this is not used -log messages come out on the terminal. When running as a daemon this is where the log information will go. In the example above I created a directory specifically for AppDaemon to run from, although there is no reason you can’t keep it in theappdaemondirectory of the cloned repository. Iflogfile = STDOUT, output will be sent to stdout instead of stderr when running in the foreground, if not specified, output will be sent to STDOUT.errorfile(optional) is the name of the logfile for errors - this will usually be errors during compilation and execution of the apps. Iferrorfile = STDERRerrors will be sent to stderr instead of a file, if not specified, output will be sent to STDERR.diagfile(optional) is the name of the log files for diagnostic information. This will contain information form thelog_thread_actionsparameter, as well as information dumped from AppDaemon’s internal state when the AppDaemon process is sent aSIGUSR1signal.log_size(optional) is the maximum size a logfile will get to before it is rotated if not specified, this will default to 1000000 bytes.log_generations(optional) is the number of rotated logfiles that will be retained before they are overwritten if not specified, this will default to 3 files.
appdaemon
The appdaemon: section has a number of directives:
threads(required) - the number of dedicated worker threads to create for running the apps. Note, this will bear no resembelance to the number of apps you have, the threads are re-used and only active for as long as required to run a particular callback or initialization, leave this set to 10 unless you experience thread starvationfilters(optional) - see belowplugins(required) - see belowlatitude(optional) - latitude for AppDaemon to use. If not specified, AppDaemon will query the latitude from Home Assistantlongitude(optional) - longitude for AppDaemon to use. If not specified, AppDaemon will query the longitude from Home Assistantelevation(optional) - elevation for AppDaemon to use. If not specified, AppDaemon will query the elevation from Home Assistanttime_zone(optional) - timezone for AppDaemon to use. If not specified, AppDaemon will query the timezone from Home Assistantapi_key(optional) - adds the requirement for AppDaemon API calls to provide a key in the header of a requestapi_ssl_certificate(optional) - certificate to use when running the API over SSLapi_ssl_key(optional) - key to use when running the API over SSLexclude_dirs(optional) - a list of subdirectories to ignore under the apps directory when looking for appsmissing_app_warnings(optional) - by default, AppDaemon will log a warning if it finds a python file that has no associated configuration in an apps.yaml file. If this parameter is set to1the warning will be suppressed. This allows non-appdaemon python files to be distributed along with apps.invalid_yaml_warnings(optional) - by default, AppDaemon will log a warning if it finds an apps.yaml file that doesn’t include “class” and “module” for an app. If this parameter is set to1the warning will be suppressed. This is intended to ease the distribution of additional yaml files along with apps.production_mode(optional) - If set to true, AppDaemon will only check for changes in Apps and apps.yaml files when AppDaemon is restarted, as opposed to every second. This can save some processing power on busy systems. Defaults toFalselog_thread_actions(optional) - if set to 1, AppDaemon will log all callbacks on entry and exit for the scheduler, events and state changes - this can be useful for troubleshooting thread starvation issues
When using the exclude_dirs directive you should supply a list of directory names that should be ignored, e.g.
exclude_dirs:
    - dir1
    - dir2
    - dir3
AppDaemon will search for matching directory names at any level of the folder hierarchy under appdir and will exclude that directory and any beneath it. It is not possible to match multiple level directory names e.g. somedir/dir1. In that case the match should be on dir1, with the caveat that if you have dir1 anywhere else in the hierarchy it will also be excluded.
secrets
AppDaemon supports the use of secrets in the configuration file, to allow separate storage of sensitive information such as passwords. For this to work, AppDaemon expects to find a file called secrets.yaml in the configuration directory, or a named file introduced by the top level secrets: section. The file should be a simple list of all the secrets. The secrets can be referred to using a !secret value in the configuration file.
The secret: section is optional. If it doesn’t exist, AppDaemon looks for a file called secrets.yaml in the config directory.
An example secrets.yaml might look like this:
token: ABCDEFG
appdaemon_key: password456
The secrets can then be referred to as follows:
appdaemon:
  api_key: !secret appdaemon_key
  threads: '10'
  plugins:
    HASS:
      type: hass
      token: !secret token
      ha_url: http://192.168.1.20:8123
Filters
The use of filters allows you to run an arbitary command against a file with a specific extenstion to generate a new .py file. The usecases for this are varied, but this can be used to run a preprocessor on an app, or perhaps some kind of global substitute or any of a number of other commands. AppDaemon, when made aware of the filter via configurtion, will look for files in the appdir with the specified extension, and run the specified command on them writing the output to a new file with the specified extension. The output extension would usually be a .py file whcih would then be picked up by normal app processing, meaning that if you edit the original input file, the result will be a new .py file that is part of an app whcih will then be restarted.
In addition, it is possible to chain multiple filters, as the filter list is processed in order - just ensure you end with a .py file.
A simple filter would look like this:
filters:
  - command_line: /bin/cat $1 > $2
    input_ext: cat
    output_ext: py
This would result in AppDaemon looking for any files with the extension .cat and running the /bin/cat command and creating a file with an extension of .py. In the command_line, $1 and $2 are replaced by the correctly named input and output files. In this example the output is just a copy of the input but this technique could be used with commands such as sed and awk, or even m4 for more complex manipulations.
A chained set of filters might look like this:
filters:
  - command_line: /bin/cat $1 > $2
    input_ext: mat
    output_ext: cat
  - command_line: /bin/cat $1 > $2
    input_ext: cat
    output_ext: py
These will run in order resulting in edits to a .mat file running through the 2 filters and resulting in a new .py file which will run as the app in the usual way.
Finally, it is possible to have multiple unconnected fiters like so:
filters:
  - command_line: /bin/cat $1 > $2
    input_ext: mat
    output_ext: .py
  - command_line: /bin/cat $1 > $2
    input_ext: cat
    output_ext: py
Here we have defined .mat and .cat files as both creating new apps. In a real world example the command_line would be different.
Plugins
In the example above, you will see that home assistant is configured as a plugin (called HASS). For most applications there is little significance to this - just configure a single plugin for HASS exactly as above. However, for power users this is a way to allow AppDaemon to work with more than one installation of Home Assistant and/or other plugins such as MQTT.
The plugin architecture also allows the creation of plugins for other purposes, e.g. different home automation systems.
To configure more than one plugin, simply add a new section to the plugins list and configure it appropriately.
Before you do this, make sure to review the section on namespaces to fully understand what this entails, and if you are using more than one plugin, make sure you use the namespace directive to create a unique namespace for each plugin.
(One of the plugins may be safely allowed to use the default value, however any more than that will require the namespace directive. There is also no harm in giving them all namespaces, since the default namespace is literally default
and has no particular significance, it’s just a different name, but if you use namespaces other than default you will need to change your Apps to understand which namespaces are in use.).
Plugin Configuration
In the required plugins: sub-section, there will usually be one or more plugins with a number of directives introduced by a top level name. Some of these are common to all plugins:
type(required) The type of the plugin.namespace(optional) - which namespace to use. This can safely be left out unless you are planning to use multiple plugins (see below)
The rest will vary depending upon which plugin type is in use.
Configuration of the HASS Plugin
To configure the HASS plugin, in addition to the required parameters above, you will need to add the following:
type:This must be declared and it must behassha_url(required for thehassplugin) is a reference to your home assistant installation and must include the correct port number and scheme (http://orhttps://as appropriate)ha_keyshould be set to your home assistant API password if you have one, otherwise it can be removed. This directive is deprecated - you should use thetokendirective insteadtoken(required) - set the long lived token for access to your hass instance (see later for a description of how to create a long lived access token)cert_verify(optional) - flag for cert verification for HASS - set toFalseto disable verification on self signed certs, or certs for which the address used doesn;tmatch the cert address (e.g. using an internal IP address)api_port(optional) - Port the AppDaemon RESTFul API will listen on. If not specified, the RESTFul API will be turned off.app_init_delay(optional) - If sepcified, when AppDaemon connects to HASS each time, it will wait for this number of seconds before initializing apps and listening for events. This is useful for HASS instances that have subsystems that take time to initialize (e.g. zwave).
Optionally, you can place your apps in a directory other than under the
config directory using the app_dir directive.
e.g.:
app_dir: /etc/appdaemon/apps
An example of the HASS plugin could look like the following:
secrets: /some/path
log:
  accessfile: /export/hass/appdaemon_test/logs/access.log
  errorfile: /export/hass/appdaemon_test/logs/error.log
  logfile: /export/hass/appdaemon_test/logs/appdaemon.log
  log_generations: 3
  log_size: 1000000
appdaemon:
  threads: 10
  time_zone: <time zone>
  api_port: 5000
  api_key: !secret api_key
  api_ssl_certificate: <path/to/root/CA/cert>
  api_ssl_key: <path/to/root/CA/key>
  plugins:
    HASS:
      type: hass
      ha_url: <some_url>
      token: <token>
      cert_path: <path/to/root/CA/cert>
      cert_verify: True
      namespace: default
HASS Authentication
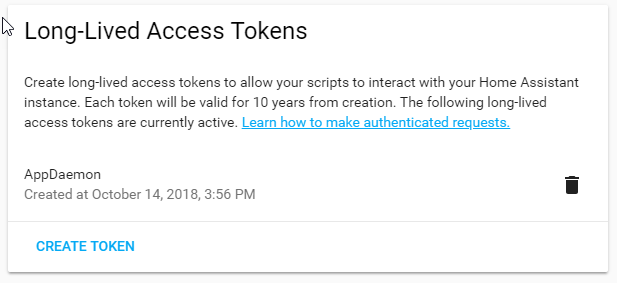
HASS has recently moved to a new authentication model. For programs such as AppDaemon it is necessary to create a Long Lived Access Token, then provide that token to AppDaemon with the token directive in the HASS plugin parameters. To create a Long Lived Access Token for AppDaemon, do the following:
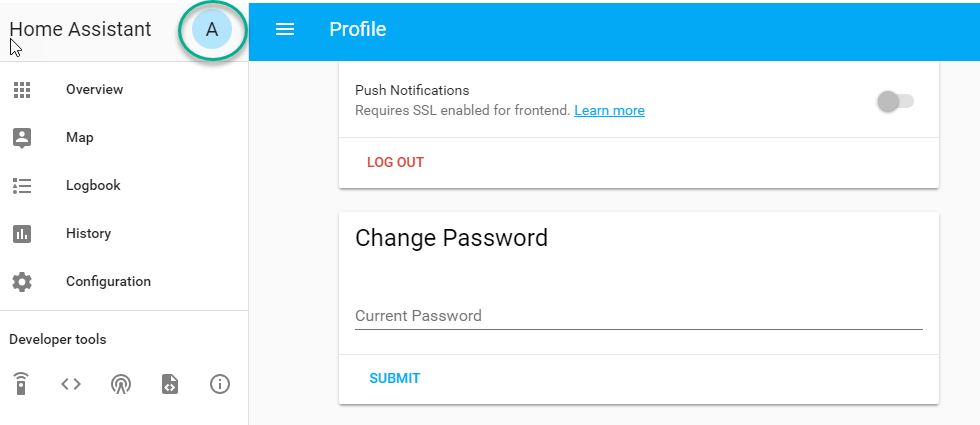
- Login as the user that you want to create the token for and open the user profile. The profile is found by clicking the icon next to the
Home Assistantlabel to the left of the web ui when the burger menu is clicked:
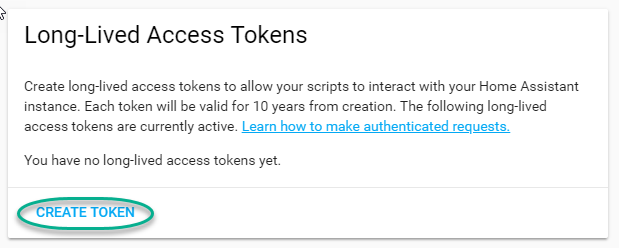
- At the bottom of the user profile is the Long Lived Access Tokens section. Click on “Create Token”
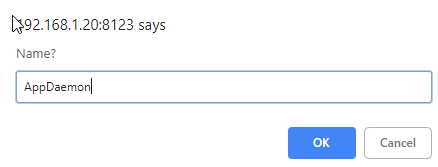
This will pop up a dialog that asks you for the name of the token - this can be anything, it’s just to remind you what the token was created for - AppDaemon is as good a name as any. When you are done click OK
- A new dialog will popup with the token itself showing:
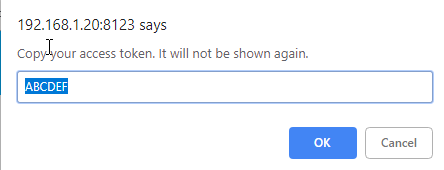
Copy this string and add it as the argument of the token directive in your HASS Plugin section:
token: ABCDEF
A real token will be a lot longer than this and will consist of a string of random letters and numbers, for example:
eyJ0eXAiOiJKV1QiLCJhbGciOiJIUzI1NiJ9.eyJpc3MiOiIwZmRkYmE0YTM0MTY0M2U2ODg5NDdiNmYxNjlkM2IwOSIsImlhdCI6MTUzOTU0NzM4NCwiZXhwIjoxODU0OTA3Mzg0fQ.zNwQqxKkx2ppUIS9Mm7rSLFiyaTNDP5HIlg7_SnxsS8
- A reference to your new token will be shown in the Long Lived tokens section, and you can revoke acess via this token at any time by pressing the delete icon. The token will last for 10 years.
Configuration of the MQTT Plugin
To configure the MQTT plugin, in addition to the required parameters above, you will need to add the following:
type:This must be declared and it must bemqttnamepace:(optional) This will default todefaultverbose:(optional) If wanting to view all data recieved by the plugin in the log, set this toTrue. ItsFalseby defaultclient_host:(optional) The IP address or DNS of the Broker. Defaults to 127.0.0.1 which is the localhostclient_port:(optional) The port number used to access the broker. Defaults to1883client_transport:(optional) The transport protocol used to access the broker. This can be eithertcporwebsocketsDefaults totcpclient_clean_session:(optional) If the broker should clear the data belonging to the client when it disconnects. Defaults toTrueclient_id:(optional) The client id to be used by the plugin, to connect to the broker. If not declared, this will be auto generated by the plugin. The generated the client id can be retreived within the appclient_user:(optional) The username to be used by the plugin to connect to the broker. It defaults toNone, so no username is usedclient_password:(optional) The password to be used by the plugin to connect to the broker. It defaults toNone, so no password is usedclient_cert:(optional) The certificate to be used when using SSLverify_cert:(optional) This is used to determine if to verify the certificate or not. This defaults toTrueand should be left as True; if not no need having any certificate installedevent_name:(optional) The preferred event name to be used by the plugin. This name is what apps will listen to, to pick up data within apps. This defaults toMQTT_MESSAGEclient_topics:(optional) This is a list of topics the plugin is to subscribe to on the broker. This defaults to#, meaning it subscribes to all topics on the brokerclient_qos:(optional) The quality of service (QOS) level to be used in subscribing to the topicsbirth_topic:(optional) This is the topic other clients can subscribe to, to pick up the data sent by the client, when the plugin connects to the broker. If not specified, one is auto generatedbirth_payload:(optional) This is the payload sent by the plugin when it connects to the broker. If not specified, it defaults toonlinewill_topic:(optional) This is the topic other clients can subscribe to, to pick up the data sent by the broker, when the plugin unceremonously disconnects from the broker. If not specified, one is auto generatedwill_payload:(optional) This is the payload sent by the broker when the plugin unceremonously disconnects from the broker. If not specified, it defaults tooffline
All auto-generated data can be picked up within apps, using the self.get_plugin_config() api
An example of the MQTT plugin could look like the following:
Configuring a Test App
(This test app assumes use of the HASS plugin, changes will be required to the app if another plugin is in use)
To add an initial test app to match the configuration above, we need to
first create an apps subdirectory under the conf directory. Then
create a file in the apps directory called hello.py, and paste the
following into it using your favorite text editor:
import appdaemon.plugins.hass.hassapi as hass

#
# Hello World App
#
# Args:
#

class HelloWorld(hass.Hass):

  def initialize(self):
     self.log("Hello from AppDaemon")
     self.log("You are now ready to run Apps!")
Then, we can create a file called apps.yaml in the apps directory and add an entry for the Hello World App like this:
hello_world:
  module: hello
  class: HelloWorld
App configuration is fully described in the API doc.
With this app in place we will be able to test the App part of AppDaemon when we first run it.
Configuring the Dashboard
Configuration of the dashboard component (HADashboard) is described separately in the Dashboard doc
Example Apps
There are a number of example apps under conf/examples in the git
repository , and the conf/examples.yaml file gives sample parameters
for them.