Development
If you would like to improve AppDaemon, we are pleased to receive Pull Requests in the official AppDaemon repository. Here are a few things to help you get started.
Please note, if some documentation is required to make sense of the PR, the PR will not be accepted without it.
Tools
Although it’s certainly possible to use other tools for any of this, these are what’s used by the contributors.
Python
- uv
An extremely fast Python package and project manager, written in Rust.
- ruff
An extremely fast Python linter and code formatter, written in Rust.
- pytest
The pytest framework makes it easy to write small, readable tests, and can scale to support complex functional testing for applications and libraries.
- pre-commit
A framework for managing and maintaining multi-language pre-commit hooks. Once enabled, these run things like the linter on every commit.
- sphinx for readthedocs
Sphinx is a powerful documentation generator that has many features for writing technical documentation. Sphinx is written in Python, and supports documentation written in reStructuredText and Markdown.
IDEs
VSCode
The AppDaemon repo itself contains some configuration specifically for VSCode, which makes some routine tasks easier.
- Python
The Python extension makes Visual Studio Code an excellent Python editor, works on any operating system, and is usable with a variety of Python interpreters.
- Python testing
The Python extension builds on the built-in testing features in VS Code and provides test discovery, test coverage, and running and debugging tests for Python’s built-in unittest framework and pytest.
- Ruff Extension
A Visual Studio Code extension for Ruff, an extremely fast Python linter and code formatter, written in Rust. Available on the Visual Studio Marketplace.
PyCharm
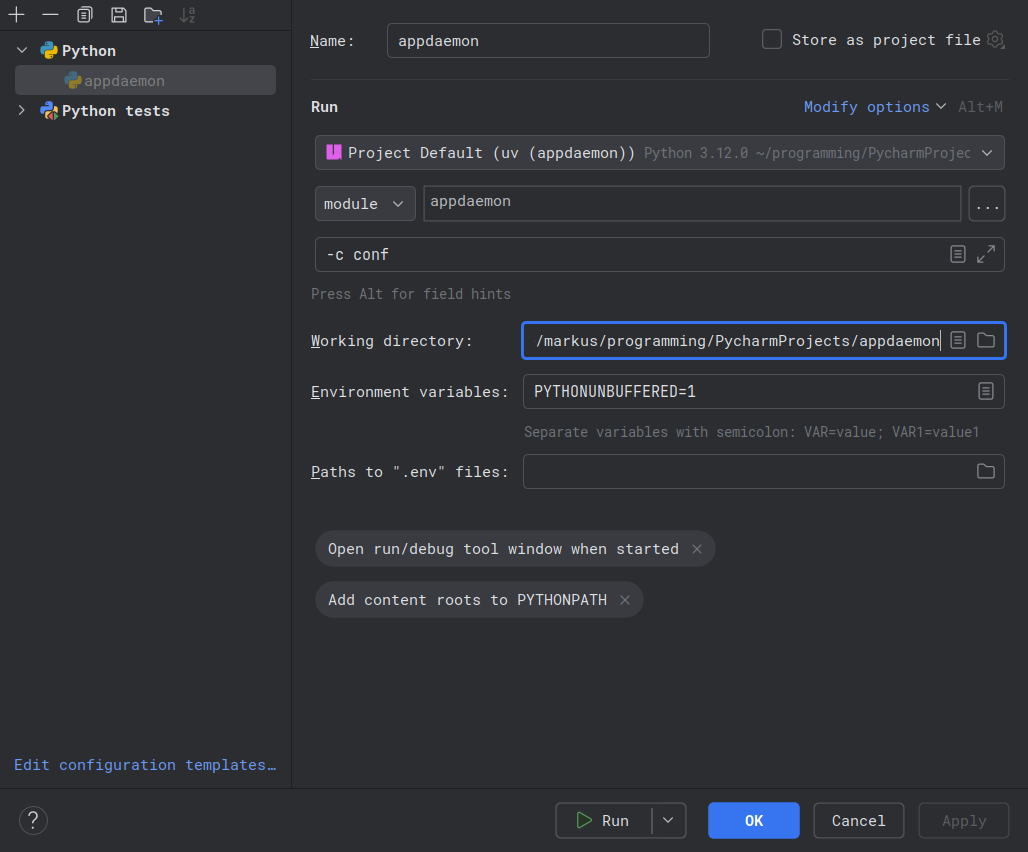
PyCharm is another popular Python IDE. To run and debug AppDaemon from PyCharm, create a Python run configuration with the following important settings:
- Run the module (not the
__main__.py): Create a new Run/Debug Configuration: Run → Edit Configurations… → + → Python. Select the
Moduleoption and enter the package/module (e.g.appdaemon). Do not point the configuration at__main__.py— run the package/module instead.
- Run the module (not the
- Set parameters as usual:
If you need to pass arguments (for example to point to a config directory), set them in “Parameters” (e.g.
-c ./conf).
- Set the working directory to the project root:
Do not set the
appdaemondirectory as the working directory; set the project root instead (the directory that containsappdaemon).
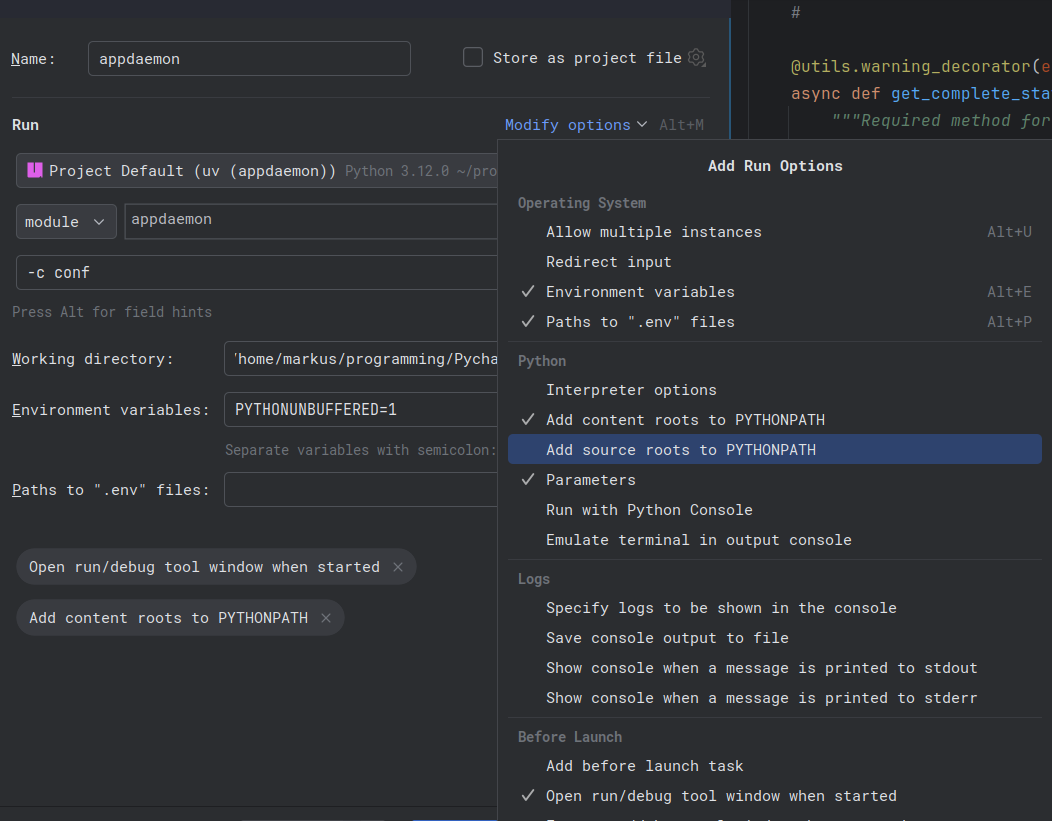
- Disable
Add source roots to PYTHONPATH: In the same configuration, uncheck the “Add source roots to PYTHONPATH” option (and “Add content roots to PYTHONPATH” if present in your PyCharm version). This prevents PyCharm from changing import paths in a way that differs from typical runtime environments.
- Disable
Dev Setup
Pre-requisites
For the easiest setup, install uv first.
$ curl -LsSf https://astral.sh/uv/install.sh | sh
powershell -ExecutionPolicy ByPass -c "irm https://astral.sh/uv/install.ps1 | iex"
Clone the repository
Download a copy of the official AppDaemon repository by cloning it somewhere locally. The dev branch is generally used for this because it’s what PRs are submitted against.
$ git clone -b dev https://github.com/AppDaemon/appdaemon.git
You can clone specific versions by changing dev to something else. Including a path like ./ad-442 will clone it there instead of into ./appdaemon.
$ git clone -b 4.4.2 https://github.com/AppDaemon/appdaemon.git ./ad-442
All subsequent commands need to be run from inside the newy created directory.
Dependencies
Use the uv sync command to create the Python virtual environment and install the dependencies.
$ uv sync
The extra doc is optional, but needed to work on the documentation.
$ uv sync --group doc
Pre-Commit Hooks
Install the pre-commit hooks that will run some checks/linting prior to each commit. These are the same as what’s run as part of the CI pipeline, and any PRs will have to pass these checks before being accepted.
$ uv run pre-commit install
Open VSCode
$ code .
Dev Workflow
Updating
When there are updates on the dev branch and you want to pull over the latest changes, run the following command from the repo directory:
$ git pull
You can also change to a new branch by using this command. This will check out a local testing branch that will track the origin/testing branch on GitHub, so it can be updated in the future with pull commands.
$ git checkout --track origin/testing
Config
Copy the default configuration file (edit it if you need to tweak some settings):
$ cp conf/appdaemon.yaml.example conf/appdaemon.yaml
Building
To build a Python distribution package (wheel), run the following command:
$ uv build --wheel --refresh
It will output the result of the build inside a ./dist folder. This must be done before building the Docker image because the build process installs AppDaemon from this wheel.
$ docker build -t acockburn/appdaemon:local-dev .
For convenience there’s an included script that handles both of these steps.
$ ./scripts/docker-build.sh
$ ./scripts/multiplatform-docker-build.sh
Running
Using uv to run AppDaemon ensures that the dependencies are all met.
$ uv run appdaemon -c ./conf
In most cases, it is possible to share configuration directories with other AppDaemon instances. However, you must be aware of AppDaemon apps that use new features as they will likely cause errors for the other pre-existing version. It is recommended to use an entirely separate configuration directory for your development environment.
One-off tests of different versions can also be easily run using uv. This creates and uses the necessary python environment in a cache directory.
$ uvx -p 3.11 --from git+https://github.com/AppDaemon/appdaemon@testing appdaemon -c /conf
Documentation
Assistance with the docs is always welcome, whether its fixing typos and incorrect information or reorganizing and adding to the docs to make them more helpful. To work on the docs, submit a pull request with the changes, and I will review and merge them in the usual way. I use Read the Docs to build and host the documentation pages. You can easily preview your edits locally, by running the following command:
  $ uv run \
    --group doc \
    sphinx-autobuild \
    --show-traceback --fresh-env \
    --host 0.0.0.0 --port 9999 \
    --watch ./appdaemon \
    --watch ./tests \
    docs/ build/docs
This will start a local web server (http://localhost:9999) that will host the documentation. If any of the files change, the server will automatically regenerate the documentation its hosting, which takes a moment, but this feature is still very useful. When you finish your edits, you can stop the server via Ctrl-C.
Dependencies
The pyproject.toml file defines the dependencies according to the PEP 631 convention, and the dependencies are tracked using a lockfile, which is managed by uv. In general, only the minimum versions are specified in pyproject.toml, but uv resolves everything to the latest compatible versions and stores the exact versions in the lockfile. This pins all the exact versions of all the dependencies, both direct and indirect.
dependencies = [
    'importlib-metadata; python_version<"3.8"',
    'aiohttp >= 3.9.0,< 3.12.0',
    'aiohttp_jinja2 >= 1.5.1,< 1.7.0',
    'astral ~= 3.2',
    'bcrypt >= 4.0.1,< 4.3.0',
    'deepdiff == 8.2.0',
    'feedparser ~= 6.0.10',
    'iso8601 >= 1.1,< 2.2',
    'paho-mqtt >= 1.6.1,< 2.2.0',
    "pid~=3.0.4",
    'python-dateutil >= 2.8.2,< 2.10.0',
    'python-socketio >= 5.5,< 5.12',
    'pytz >= 2022.7.1,< 2025.2.0',
    'pyyaml ~= 6.0.1',
    'requests >= 2.28.2,< 2.33.0',
    'sockjs >= 0.11,< 0.14',
    'uvloop==0.21.0; sys_platform != "win32"',
    'tomli==2.2.1',
    'tomli_w >= 1.0,< 1.3',
    'pydantic ~= 2.10.6',
Testing
See the Testing AppDaemon page for more details.
VSCode Tasks
VSCode has a feature called tasks, which allow it to integrate with external tools. Essentially it allows developers to run pre-defined commands and scripts using the integrated terminal. AppDaemon has several custom tasks defined to help streamline development.
With the default keybindings, you can reach the command palette with Ctrl-Shift-P or F1. Once it’s open, the list can be quickly filtered by starting to type run task. After selecting Tasks: Run Task, it will show a list of all the available tasks to run.
- Auto Build Docs
Runs the Sphinx documentation server on localhost:9999 with live reloading.
- Build Docker Image
Builds the Docker image for the application
- Build Multi-Platform Docker Images
Builds Docker images for multiple platforms and analyzes their sizes
- Install Dependencies
Installs all the dependencies, including dev and doc extras
- Ruff Statistics
Displays the statistics of all the linting violations
Docker build process
The general idea is that the wheel for AppDaemon should be built before the Docker image is, because AppDaemon gets installed from that wheel during the process to build the Docker image.
Building the container locally requires Docker Engine 23.0+ (released in 2023), since it enables the Docker BuildKit by default.
Layers and Caching
Efficient caching is very important for the arm/v6 and arm/v7 architectures because those versions take a while to build from scratch. Dependencies are installed in a separate operation before installing AppDaemon itself to make efficient use of Docker’s layers. Cache mounts are also used on relevant operations to significantly speed up the build process and prevent unnecessarily redownloading or rebuilding packages.
Stages
The Docker image is split up using a multi-stage build in order to keep the final image size as small as possible (~45 MB on all platforms).
- builder stage
The builder stage fully constructs the python environment needed to run AppDaemon, but sometimes installing python packages requires some extra tools to to build them beforehand. For example, the orjson and uvloop packages don’t provide pre-built wheels for the arm/v6 and arm/v7 architectures, so they need a few extra tools (git, rust, etc.) installed in order to be able to build wheels for them when the AppDaemon dependencies are installed.
- runtime stage
The runtime stage copies the now-ready python environment into a fresh image without any of the baggage from the previous stage.
Multi-Platform
The general idea is that the Docker buildkit creates and sets up a Docker container that has all the necessary stuff to build on different platforms. There’s a way to specify multiple platforms and use this container to build images for all of the simultaneously. A VSCode task is provided that runs a script that handles all of this automatically. This allows developers to easily test builds across the supported platforms.
GitHub Actions
AppDaemon makes use of several GitHub actions for its CI pipeline.
Dependabot
Monitor vulnerabilities in dependencies used in your project and keep your dependencies up-to-date with Dependabot.
Dependabot supports updates to pyproject.toml files if they follow the PEP 621 standard.
Dependabot also supports updating uv.lock files.
Lint and Test
The linter runs as part of the pre-commit hooks, and if it succeeds, the pytest tests marked as ci are run for each supported Python version.
Also includes codespell for spelling checks.
Python Wheel
The Python wheel is built and uploaded to a ./dist directory in the GitHub runner.
Docker Build and Push
The Docker image is built for each platform (linux/amd64, linux/arm64/v8, linux/arm/v7, linux/arm/v6) and published to Docker Hub on dev branch pushes and git tags.