Configuration
When you have AppDaemon installed using either Docker or pip, you are ready to
start working on the appdaemon configuration file, its main configuration file.
Appdaemon Configuration File Format
The AppDaemon configuration file is usually a YAML file, however from appdaemon 4.3.0 and onwards, appdaemon’s configuration file
as well as the app configuration files can be specified in TOML rather than YAML. AppDaemon will now work transparently with either yaml or toml files,
allowing the user to mix and match and convert from one format to another over time. In the event of a conflict, the yaml file will take precedence.
YAML and TOML configuration files are identical in function and capabilities, it is a matter of personal preference which format is used. At this time,
TOML configuration is not available for HADashboard. Note that AppDaemon expects any secrets files to have the same file extension as the configuration file that references those secrets.
A useful online resource for converting from YAML to TOML and back can be found at transform tools.
Configuring AppDaemon
If you are using Docker, you should already have a skeleton configuration generated the first-time the container is run, under the bind-mounted configuration directory.
For pip users, create a configuration directory somewhere where all the AppDaemon data will be stored (e.g., /home/homeassistant/conf) and create a file in there called appdaemon.yaml.
The top level configuration is divided in various sub-sections:
Minimal example
A minimal appdaemon.yaml file should look something like this.
The plugins section configures the communication with Home Assistant.
# appdaemon.yaml
appdaemon:
  time_zone: CET
  latitude: 51.725
  longitude: 14.3434
  elevation: 0
  plugins:
    HASS:
      type: hass
      ha_url: <home_assistant_base_url>
      token: <some_long_lived_access_token>
The same configuration in a TOML file would be called appdaemon.toml and would look like this:
[appdaemon]
time_zone = "CET"
latitude = 51.725
longitude = 14.3434
elevation = 0

[appdaemon.plugins.HASS]
type = "hass"
ha_url = "<home_assistant_base_url>"
token = "<some_long_lived_access_token>"
Both YAML and TOML files work in similar ways to express atomic values, lists and dictionaries, from this point on, some examples will be given in both formats, but the end-user is encouraged to learn the ins and outs of both formats to help in converting configurations from one format to another.
Plugins
In the example above, you will see the inclusion of a plugin called HASS.
This is used to configure the communication with a Home Assistant instance.
For most applications there is little significance to this - just configure a single plugin for HASS exactly as above. However, for power users, this is a way to allow AppDaemon to work with more than one installation of Home Assistant and/or other plugins such as MQTT.
The plugin architecture also allows the creation of plugins for other purposes, e.g., different home automation systems.
To configure more than one plugin, simply add a new section to the plugins section and configure it appropriately. See the plugins section for more details.
Before you do this, make sure to review the section on namespaces to fully understand what this entails, and if you are using more than one plugin, make sure you use the namespace directive to create a unique namespace for each plugin.
(One of the plugins may be safely allowed to use the default value, however, any more than that will require the namespace directive. There is also no harm in giving them all namespaces, since the default namespace is literally default
and has no particular significance, it’s just a different name, but if you use namespaces other than default you will need to change your Apps to understand which namespaces are in use.).
appdaemon
The following options are available under the appdaemon section:
Name |
Description |
Required |
|---|---|---|
time_zone |
Used by AppDaemon for its internal time-related operations (e.g. America/New_York). |
Yes |
latitude |
Used by AppDaemon for its internal location-related operations (decimal format). |
Yes |
longitude |
Used by AppDaemon for its internal location-related operations (decimal format). |
Yes |
elevation |
Meters above sea level. Used by AppDaemon for its internal location-related operations. |
Yes |
plugins |
Configure the plugins used by AppDaemon to communicate with third-party systems (e.f. Home Assistant, MQTT broker). See the plugins section for more details. |
Yes |
filters |
See the filters section for more details. |
No |
app_dir |
Load AppDaemon apps from a different directory than the default configuration directory. |
No |
exclude_dirs |
When loading AppDaemon apps in the Example: exclude_dirs:
- dir1
- dir2
- dir3
AppDaemon will traverse the folder hierarchy starting from the Note: It is not possible to match multiple level directory names e.g., |
No |
missing_app_warnings |
AppDaemon by default outputs a warning if it finds a Python file that has no associated configuration in an app config file. Set this parameter to |
No |
invalid_config_warnings |
AppDaemon by default outputs a warning if it finds an app config file file that doesn’t include Set this parameter to |
No |
production_mode |
Defaults to This option can also be changed from within apps, using the |
No |
thread_duration_warning_threshold |
AppDaemon monitors the time that each thread spends in an App.
If a thread is taking too long to finish a callback, it may impact other apps.
AppDaemon will log a warning if any thread is over the duration specified in seconds. The default is |
No |
log_thread_actions |
If set to |
No |
import_paths |
Use this directive to add additional arbitrary directories to the python interpreter’s search path. Directories must be fully qualified. |
No |
discard_init_events |
If set to |
No |
filters
The use of filters allows you to run an arbitrary command against a file with a specific extension to generate a new .py file. The use-cases for this are varied, but this can be used to run a preprocessor on an app, or perhaps some kind of global substitute or any of a number of other commands.
When a filter is defined, AppDaemon looks for files in the appdir directory with the specified extension, and runs the specified command on them, writing the output to a new file with the specified extension.
The output extension would usually be a .py file which would then be picked up by normal app processing, meaning that if you edit the original input file, the result will be a new .py file that is part of an AppDaemon app which will then be restarted.
In addition, it is possible to chain multiple filters, as the filter list is processed in order - just ensure you end with a .py file.
NOTE: The following are toy examples, in a real-world scenario the command_line would be different.
Simple filter
A simple filter would look like this:
filters:
  - command_line: /bin/cat $1 > $2
    input_ext: cat
    output_ext: py
This would result in AppDaemon looking for any files with the extension .cat , invoking /bin/cat command on them and creating a file with an extension of .py.
In the command_line, $1 and $2 are replaced by the correctly named input and output files. In this sample filter, the output file is just a copy of the input, but this technique could be used with more advanced commands such as sed and awk, or even m4 if more complex manipulations are needed.
Chaining filters
A chained set of filters might look like this:
filters:
  - command_line: /bin/cat $1 > $2
    input_ext: mat
    output_ext: cat
  - command_line: /bin/cat $1 > $2
    input_ext: cat
    output_ext: py
These filters will run in the defined order: starting from a .mat file, the first filter outputs a .cat file, then the second filter picks it up, outputting a final .py file, which can be used as a AppDaemon app in the usual way.
Distinct filters
Finally, it is possible to have multiple unconnected filters like so:
filters:
  - command_line: /bin/cat $1 > $2
    input_ext: mat
    output_ext: .py
  - command_line: /bin/cat $1 > $2
    input_ext: cat
    output_ext: py
Here we have defined .mat and .cat files as both creating new .py files, unrelated to each other.
Advanced options
The following settings provide a high level of control over AppDaemon’s internal functioning, but for most users they should be left at their default settings.
Name |
Description |
Default |
|---|---|---|
total_threads |
The number of dedicated worker threads to create for running the apps.
Normally, AppDaemon will create enough threads to provide one per app, or default to Setting this to a specific value will turn off automatic thread management. |
|
loglevel |
The global log level for AppDaemon’s main log. This can be set to |
|
pin_apps |
If |
|
pin_threads |
Number of threads to use for pinned apps, allowing the user to section off a sub-pool just for pinned apps. By default all threads are used for pinned apps. |
|
threadpool_workers |
Maximum number of worker threads to be internally used by AppDaemon to execute the calls asynchronously. |
|
load_distribution |
Algorithm to use for load balancing between unpinned apps. Possible values: |
|
timewarp |
Equivalent to the command line flag |
|
qsize_warning_threshold |
Total number of items on thread queues before a warning is issued. |
|
qsize_warning_step |
If total queue size is over |
|
qsize_warning_iterations |
If set to a value greater than This allows you to tune out brief expected spikes in queue size. |
|
uvloop |
If |
|
namespaces |
Configure one or more User Defined Namespaces and set their writeback strategy. Example: namespaces:
andrew:
# writeback is one of
# `safe` or `hybrid`
writeback: safe
fred:
writeback: hybrid
|
logs
This section is entirely optional. It consists of a number of log entries that describe both system and user logs.
The logs named main_log, error_log, diag_log and access_log have special significance and are used to describe AppDaemons system logs.
Any other named log under this section will result in the creation of a user log, which can be written to by your apps.
The 4 built-in system logs are the following:
main_logis the path to where you wantAppDaemonto keep its main log.error_logis the name of the logfile for errors - this will usually be errors during compilation and execution of the apps.If
errorfile = STDERRerrors are sent to stderr instead of a file, if not specified, the output will be sent to STDERR.diag_logis the name of the log file for diagnostic information. This will contain information form thelog_thread_actionsparameter, as well as information dumped from AppDaemon’s internal state when the AppDaemon process is sent aSIGUSR1signal.access_logis the log that AppDaemon will write access information to for HADashboard and the admin interface.
All 4 logs have defaults, so they do not need to be specified, but if any parameters are defined, they will override the defaults.
A simple logs section might look like this:
logs:
  main_log:
    filename: /export/pegasus/hass/appdaemon_test/logs/appdaemon.log
  access_log:
    filename: /export/pegasus/hass/appdaemon_test/logs/access.log
  error_log:
    filename: /export/pegasus/hass/appdaemon_test/logs/error.log
  diag_log:
    filename: /export/pegasus/hass/appdaemon_test/logs/diag.log
    log_generations: 5
    log_size: 1024
    format: "{asctime} {levelname:<8} {appname:<10}: {message}"
  test_log:
    name: TestLog
    filename: /export/pegasus/hass/appdaemon_test/logs/test.log
All directives are optional with the exception of name for user defined logs. The directives have the following meanings:
The directives are as follows:
filename(optional) is the path to where you want the file to be written. If the directive is not specified, the output is sent to STDOUT.log_size(optional) is the maximum size a logfile will get to before it is rotated if not specified, this will default to 1000000 bytes.log_generations(optional) is the number of rotated logfiles that will be retained before they are overwritten if not specified, this will default to 3 files.format(optional) Format string for the log file - standard str.format() logger formatdate_format(optional) - Format string to specify how the date is rendered in standard datetime strftime() formatfilter_threshold(optional) - number of repetitions of a log line allowed before filtering starts (default is 1). Settingfilter_thresholdto zero will turn off log filtering entirely - since AppDaemon relies on this mechanism internally to prevent certain types of log loops, this is not recommended.filter_timeout(optional) - timeout for log filtering. Duplicate log entries that are output less frequently than this value will not have filtering applied (default is 0.9 seconds)filter_repeat_delay(optional) - when filtering, repeating messages will be printed out periodically everyfilter_repeat_delayseconds (default is 5 seconds)
Note: Filter parameters are set globally, but are applied to individual apps and modules within AppDaemon. This means that log messages interspersed from different apps or from AppDaemon itself even though different, will not reset the filtering of log messages from an individual app if they carry on repeating.
In the above example, a user-defined log called test_log has also been created this can be accessed from apps directly from its logger object, or from the self.log call as follows:
# Native logger
testlogger = self.get_user_log("test_log")
testlogger.info("Hello %s", "jim")
# self.log()
self.log("Hello", log="test_log")
Note that the AppDaemon logs use an enhanced formatter that allows interpolation of the App Name in the logger output as well as all the other standard fields. In addition, the {asctime} token will give the right results if time travel is in use. For example, the default logfile format for AppDaemon’s main log is:
{asctime} {levelname} {appname:<20}: {message}
AppDaemon’s default time format is %Y-%m-%d %H:%M:%S.%f%z.
total_threads(optional) - the number of dedicated worker threads to create for running the apps. Normally, AppDaemon will create enough threads to provide one per app, or default to 10 if app pinning is turned off. Setting this to a value will turn off automatic thread management.pin_apps(optional) - When true (the default) Apps will be pinned to a particular thread which avoids complications around re-entrant code and locking of instance variablespin_threads(optional) - Number of threads to use for pinned apps, allowing the user to section off a sub-pool just for pinned apps. Default is to use all threads for pinned apps.threadpool_workers(optional) - the number of max_workers threads to be used by AD internally to execute calls asynchronously. This defaults to10.load_distribution- Algorithm to use for load balancing between unpinned apps. Can beround-robin(the default),randomorloadtimewarp(optional) - equivalent to the command line flag-tbut will take precedenceqsize_warning_threshold- total number of items on thread queues before a warning is issued, defaults to 50qsize_warning_step- when total qsize is over``qsize_warning_thresholda warning will be issued every time theqsize_warning_steptimes the utility loop executes (normally once every second), default is 60 meaning the warning will be issued once every 60 seconds.qsize_warning_iterations- if set to a value greater than 0, when total qsize is over``qsize_warning_thresholda warning will be issued every time theqsize_warning_steptimes the utility loop executes but not until the qsize has been excessive for a minimum ofqsize_warning_iterations. This allows you to tune out brief expected spikes in Q size. Default is 5, usually meaning 5 seconds.uvloop(optional) - WhenTrue, AD will switch from using default python asyncio loop, to utilizing the uvloop. This is said to improve the speed of the loop. More can be read here about uvloop.namespaces(optional) - configure one or more User Defined Namespaces and set their writeback strategy
namespaces:
    andrew:
      # writeback is safe or hybrid
      writeback: safe
    fred:
      writeback: hybrid
use_dictionary_unpacking(optional) - when this option is set to true, AppDaemon will supply individual keyword arguments to your callback rather than a dictionary, suitable for use with the python dictionary unpack operator (**)
secrets
AppDaemon supports the use of secrets in the configuration file, to allow separate storage of sensitive information such as passwords.
By default AppDaemon looks for a file called secrets.yaml or secrets.toml in the configuration directory.
You can configure AppDaemon to load a different secrets file by defining its path by defining a top-level secrets configuration.
The file should be a simple list of all the secrets. The secrets can be later referred to using the !secret directive in the configuration file, this works for both YAML and TOML, but AppDaemon expects the secrets file to have the same type as the file that references it.
An example secrets.yaml might look like this:
token: ABCDEFG
appdaemon_key: password456
The secrets can then be referred to as follows:
appdaemon:
  api_key: !secret appdaemon_key
  threads: '10'
  plugins:
    HASS:
      type: hass
      token: !secret token
      ha_url: http://192.168.1.20:8123
plugins
In the required plugins: sub-section, there will usually be one or more plugins with a number of directives introduced by a top level name. Some of these are common to all plugins:
type(required) The type of the plugin.namespace(optional) - which namespace to use. This can safely be left out unless you are planning to use multiple plugins (see below)disable(optional) - if set totrue, the plugin will not be loaded - defaults tofalse.
Plugins also support some optional parameters:
refresh_delay- How often the complete state of the plugin is refreshed, in seconds. Default is 600 seconds.refresh_timeout- How long to wait for the state refresh before cancelling it, in seconds. Default is 30 seconds.persist_entities- If True all entities created within the plugin’s namespace will be persistent within AD. So in the event of a restart, the entities will be recreated in the same namespace
The rest will vary depending upon which plugin type is in use.
HASS
To configure the HASS plugin, in addition to the required parameters above, you will need to add the following:
type:This must be declared and it must behassha_url(required for thehassplugin) is a reference to your home assistant installation and must include the correct port number and scheme (http://orhttps://as appropriate)ha_keyshould be set to your home assistant API password if you have one, otherwise it can be removed. This directive is deprecated - you should use thetokendirective insteadtoken(required) - set the long-lived token for access to your hass instance (see later for a description of how to create a long-lived access token)cert_verify(optional) - flag for cert verification for HASS - set toFalseto disable verification on self-signed certs, or certs for which the address used doesn’t match the cert address (e.g., using an internal IP address)api_port(optional) - Port the AppDaemon RESTFul API will listen on. If not specified, the RESTFul API will be turned off.retry_secs(optional) - If specified, AD will wait for this many seconds in between retries to connect to HASS (default 5 seconds)plugin_startup_conditions- see HASS Plugin Startup Conditionsq_timeout(optional, 30 seconds) - amount of time to wait for a response from Home Assistant before returning an errorsuppress_log_messages- (optional, false) - if set to true, allcall_service()related log messages will be suppressed by default. Will be overridden by thesuppress_log_messagesargument incall_service()
For example:
app_dir: /etc/appdaemon/apps
An example of the HASS plugin configured with YAML could look like the following:
secrets: /some/path
log:
  accessfile: /export/hass/appdaemon_test/logs/access.log
  errorfile: /export/hass/appdaemon_test/logs/error.log
  logfile: /export/hass/appdaemon_test/logs/appdaemon.log
  log_generations: 3
  log_size: 1000000
appdaemon:
  threads: 10
  time_zone: <time zone>
  api_port: 5000
  api_key: !secret api_key
  api_ssl_certificate: <path/to/root/CA/cert>
  api_ssl_key: <path/to/root/CA/key>
  plugins:
    HASS:
      type: hass
      ha_url: <some_url>
      token: <token>
      cert_path: <path/to/root/CA/cert>
      cert_verify: True
      namespace: default
Or in TOML:
secrets = "/some/path"

[log]
accessfile = "/export/hass/appdaemon_test/logs/access.log"
errorfile = "/export/hass/appdaemon_test/logs/error.log"
logfile = "/export/hass/appdaemon_test/logs/appdaemon.log"
log_generations = 3
log_size = 1_000_000

[appdaemon]
threads = 10
time_zone = "<time zone>"
api_port = 5_000
api_key = "api_key"
api_ssl_certificate = "<path/to/root/CA/cert>"
api_ssl_key = "<path/to/root/CA/key>"

[appdaemon.plugins.HASS]
type = "hass"
ha_url = "<some_url>"
token = "<token>"
cert_path = "<path/to/root/CA/cert>"
cert_verify = true
namespace = "default"
Authentication
HASS has recently moved to a new authentication model. For programs such as AppDaemon it is necessary to create a Long-Lived Access Token, then provide that token to AppDaemon with the token directive in the HASS plugin parameters. To create a Long-Lived Access Token for AppDaemon, do the following:
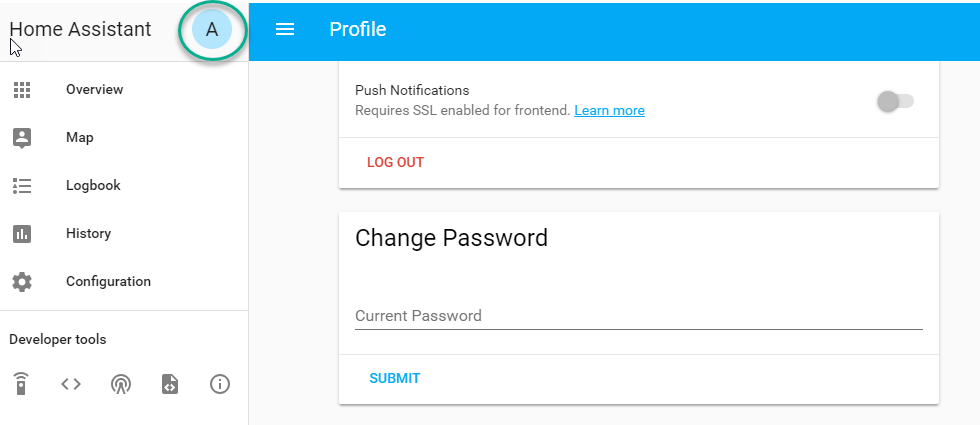
Login as the user that you want to create the token for and open the user profile. The profile is found by clicking the icon next to the
Home Assistantlabel to the left of the web ui when the burger menu is clicked:
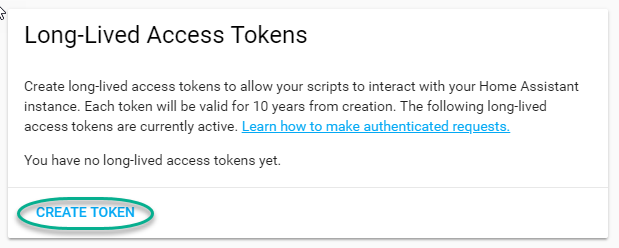
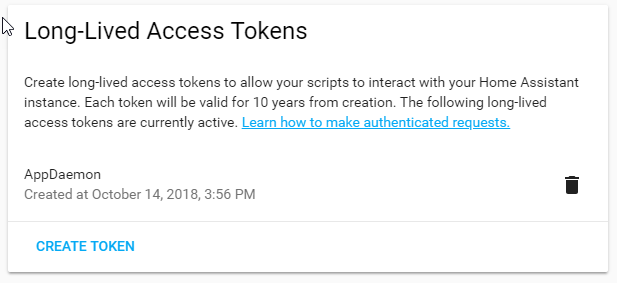
At the bottom of the user profile is the Long-Lived Access Tokens section. Click on “Create Token”
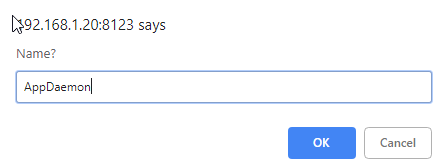
This will pop up a dialog that asks you for the name of the token - this can be anything, it’s just to remind you what the token was created for - AppDaemon is as good a name as any. When you are done click OK
A new dialog will popup with the token itself showing:
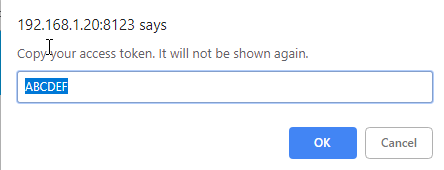
Copy this string and add it as the argument of the token directive in your HASS Plugin section:
token: ABCDEF
A real token will be a lot longer than this and will consist of a string of random letters and numbers. For example:
eyJ0eXAiOiJKV1QiLCJhbGciOiJIUzI1NiJ9.eyJpc3MiOiIwZmRkYmE0YTM0MTY0...
A reference to your new token will be shown in the Long-Lived tokens section, and you can revoke access via this token at any time by pressing the delete icon. The token will last for 10 years.
Startup Conditions
The HASS plugin has the ability to pause startup until various criteria have been met. This can be useful to avoid running apps that require certain entities to exist or to wait for an event to happen before the apps are started. These conditions are checked whenever the HASS plugin is started, including after restarts. AppDaemon will not start the HASS plugin until all of these conditions are met.
When AppDaemon starts, it waits for all the loaded plugins to become ready before starting any apps. The plugin_startup_conditions prevent the HASS plugin from becoming ready until the conditions are met. Therefore, no apps will have their initialize method ran until the conditions are met.
Each condition only has to be met once in order to be completed. If while waiting for an event, a state condition goes from unmet to met and back again, the associated condition will still be considered met.
Example placement in appdaemon.yaml:
appdaemon:
  plugins:
    hass:
      type: hass
      plugin_startup_conditions:
        delay: ...
        state: ...
        event: ...
delay
Delay startup for a number of seconds, for example:
delay: 10 # delays for 10s
state
Wait until a specific state exists or has a specific value or set of values. The values can be specified as an inline dictionary as follows:
wait until an entity exists -
state: {entity: <entity id>}wait until an entity exists and has a specific value for its state:
state: {entity: <entity id>, value: {state: "on"}}wait until an entity exists and has a specific value for an attribute:
state: {entity: <entity id>, value: {attributes: {attribute: value}}}
Example to wait for an input boolean:
state:
  entity: input_boolean.appdaemon_enable # example entity name
  value:
    state: "on" # on needs to be in quotes
Example to wait for a light to be on full brightness:
state:
  entity: light.office_1 # example entity
  value:
    state: "on" # on needs to be in quotes
    attributes:
      brightness: 255 # full brightness
event
Wait for an event or an event with specific data
wait for an event of a given type:
{event_type: <event name>}wait for an event with specific data:
{event_type: <event name>, data: {service_data: {entity_id: <some entity>}, service: <some service>}}
Example to wait for ZWave to complete initialization upon a HASS restart:
event:
  event_type: zwave.network_ready
Example to wait for an input button before starting AppDaemon
event:
  event_type: call_service
  data:
    domain: input_button
    service: press
    service_data:
      entity_id: input_button.start_appdaemon # example entity
MQTT
To configure the MQTT plugin, in addition to the required parameters above, you will need to add the following:
type:This must be declared and it must bemqttnamespace:(optional) This will default todefaultclient_host:(optional) The IP address or DNS of the Broker. Defaults to 127.0.0.1 which is the localhostclient_port:(optional) The port number used to access the broker. Defaults to1883client_transport:(optional) The transport protocol used to access the broker. This can be eithertcporwebsocketsDefaults totcpclient_clean_session:(optional) If the broker should clear the data belonging to the client when it disconnects. Defaults toTrueclient_id:(optional) The client id to be used by the plugin, to connect to the broker. If not declared, this will be auto-generated by the plugin. The generated the client id can be retrieved within the appclient_user:(optional) The username to be used by the plugin to connect to the broker. It defaults toNone, so no username is usedclient_password:(optional) The password to be used by the plugin to connect to the broker. It defaults toNone, so no password is usedclient_cert:(optional) The certificate to be used when using SSLtls_version:(optional) TLS/SSL protocol version to use. Available options are:auto,1.0,1.1,1.2. Defaults toautoverify_cert:(optional) This is used to determine if to verify the certificate or not. This defaults toTrueand should be left as True; if not no need having any certificate installedevent_name:(optional) The preferred event name to be used by the plugin. This name is what apps will listen to, to pick up data within apps. This defaults toMQTT_MESSAGEclient_topics:(optional) This is a list of topics the plugin is to subscribe to on the broker. This defaults to#, meaning it subscribes to all topics on the broker. This can be set toNONE, if it is desired to use the subscribe service call within apps, to subscribe to topics.client_qos:(optional) The quality of service (QOS) level to be used in subscribing to the topics. This will also be used as the defaultqos, when publishing and the qos is not specified by the publishing app.birth_topic:(optional) This is the topic other clients can subscribe to, to pick up the data sent by the client, when the plugin connects to the broker. If not specified, one is auto-generatedbirth_payload:(optional) This is the payload sent by the plugin when it connects to the broker. If not specified, it defaults toonlinebirth_retain:(optional) This tells the broker if it should retain the birth message. If not specified, it defaults toTruewill_topic:(optional) This is the topic other clients can subscribe to, to pick up the data sent by the broker, when the plugin unceremoniously disconnects from the broker. If not specified, one is auto-generatedwill_payload:(optional) This is the payload sent by the broker when the plugin unceremoniously disconnects from the broker. If not specified, it defaults toofflinewill_retain:(optional) This tells the broker if it should retain the will message. If not specified, it defaults toTrueshutdown_payload:(optional) This is the payload sent to the broker when the plugin disconnects from the broker cleanly. It uses the same topic as thewill_topic, and if not specified, defaults to the same payload message andwill_payloadforce_start:(optional) Normally when AD restarts, and the plugin cannot confirm connection to the MQTT broker, it keeps retrying until it has established a connection; this can prevent AD from starting up completely. This can be problematic, if AD is trying to connect to a Cloud broker, and the internet is down. If one is certain of the broker details being correct, and there is a possibility of the broker bring down (e.g., loss of internet connection if using an external broker), theforce_startflag can be set toTrue. This way AD will start up as usual, and when the broker is online, the plugin will connect to it. This defaults toFalse
All auto-generated data can be picked up within apps, using the self.get_plugin_config() API
An example of the MQTT plugin could look like the following:
MQTT:
   type: mqtt
   namespace: mqtt
   verbose: True
   client_host: Broker IP Address or DNS
   client_port: Broker PORT Number
   client_id: Client_ID
   client_user: username
   client_password: password
   ca_cert: ca_cert
   tls_version: auto
   client_cert: mycert
   client_key: mykey
   verify_cert: True
   event_name: MQTT_EVENT
   client_topics:
      - hermes/intent/#
      - hermes/hotword/#
Or in TOML:
[MQTT]
type = "mqtt"
namespace = "mqtt"
verbose = true
client_host = "Broker IP Address or DNS"
client_port = "Broker PORT Number"
client_id = "Client_ID"
client_user = "username"
client_password = "password"
ca_cert = "ca_cert"
tls_version = "auto"
client_cert = "mycert"
client_key = "mykey"
verify_cert = true
event_name = "MQTT_EVENT"
client_topics = [ "hermes/intent/#", "hermes/hotword/#" ]
Creating a test app
This test app assumes the use of the HASS plugin, changes will be required to the app if another plugin is in use.
To add an initial test app to match the configuration above, we need to
first create an apps subdirectory under the conf directory. Then
create a file in the apps directory called hello.py, and paste the
following into it using your favorite text editor:
import hassapi as hass

#
# Hello World App
#
# Args:
#

class HelloWorld(hass.Hass):

  def initialize(self):
     self.log("Hello from AppDaemon")
     self.log("You are now ready to run Apps!")
Then, we can create a file called apps.yaml in the apps directory and add an entry for the Hello World App like this:
hello_world:
  module: hello
  class: HelloWorld
Or if we are using TOML:
[hello_world]
module = "hello"
class = "HelloWorld"
App configuration is fully described in the API doc.
With this app in place we will be able to test the App part of AppDaemon when we first run it.
Configuring the HTTP Component
The HTTP component provides a unified front end to AppDaemon’s Admin Interface, HADashboard, and the AppDaemon API. It requires some initial configuration, but the dashboard and admin interface can be separately enabled or disabled. This component also creates a folder in the configuration directory called www, if it doesn’t exist. To serve custom static content like images, videos or html pages, simply drop the content into the www folder and it becomes available via the browser or dashboard. Content stored in this folder can be accessed using http://AD_IP:Port/local/<content to be accessed>. Where AD_IP:Port is the url as defined below using the http component.
It has it’s own top-level section in AppDaemon.yaml, and one mandatory argument, url:
http:
    url: http://192.168.1.20:5050
url- the URL you want the HTTP component to listen on
To password protect AppDaemon use the password directive:
http:
    url: http://192.168.1.20:5050
    password: some_password
Or you can use the secret function and place the actual password in your
secrets.yaml file:
password: !secret ad_password
To enable https support for the HTTP Component and by extension the HADashboard and Admin UI, add the following directives pointing to your certificate and keyfile:
http:
    url: http://192.168.1.20:5050
    password: some_password
    ssl_certificate: /etc/letsencrypt/live/somehost/fullchain.pem
    ssl_key: /etc/letsencrypt/live/somehost/privkey.pem
AppDaemon uses websockets as the default protocol for streaming events from AppDaemon to the dashboard and admin interface so the dashboard can respond to events in real-time. Some older devices, e.g., original iPad models, do not support websockets. In this case, you may use the alternative socket.io protocol which has better support for older devices. To do this, set the transport parameter to socketio. The default is ws which means the websockets protocol will be used:
http:
    transport: socketio
Additionally, arbitrary headers can be supplied in all server responses from AppDaemon with this configuration:
http:
  headers:
    My-Header-Here: "The Value Of My Header"
Headers are especially useful for dealing with CORS. In order to allow CORS from any domain, consider the following configuration:
http:
  headers:
    Access-Control-Allow-Origin: "*"
This component can also be used to setup custom static directories, which has contents within it that needs to be served using AD’s internal web server. This can range from images, videos, html pages and the likes. To do this, consider the configuration below:
http:
  static_dirs:
    videos: /home/pi/video_clips
    pictures: /home/pi/pictures
The above configuration assumes that the user has a folder, that has stored within it video clips from like cameras. To access
the videos stored in the video_clip folder via a browser or Dashboard, the url can be used http://AD_IP:Port/local/videos/<video to be accessed>. Like wise, the pictures can be accessed using http://AD_IP:Port/local/pictures/<picture to be accessed>. Using this directive does support the use of relative paths.
Configuring the Dashboard
Configuration of the dashboard component (HADashboard) is described separately in the Dashboard documentation. Note that the dashboard depends on the HTTP section being configured to correctly function.
Configuring the API
The AppDaemon App API is configured by adding a top-level directive to appdaemon.yaml:
api:
It takes no arguments.
Configuring the Admin Interface
The updated admin Interface, new in 4.2.0 is a front end to AppDaemon that allows you to monitor it’s inner workings such as thread activity, registered callbacks and entities. Over time it is expected to evolve into a full management tool for AppDaemon allowing the user to configure, troubleshoot and monitor all of AppDaemon’s functions.
The Admin Interface is configured by first adding the HTTP Component and then also adding the top-level directive to appdaemon.yaml:
admin:
The Interface can be accessed using a web browser and pointing it to the HTTP component URL.
Note: the old admin interface can still be used by specifying the old_admin directive:
old_admin:
Accessing Directories via Apps
Directories used by AD internally either declared by the user or not, can be accessed by the user via apps. The following directories are available:
configuration: self.config_dirapps: self.app_dirdashboard: self.dashboard_dir
Example Apps
There are a number of example apps under conf/examples in the git
repository , and the conf/examples.yaml file gives sample parameters
for them.